How do I start...?
Hello hobbyists, recumbent riders and readers,
It should be a completely self-designed and not made from two old bicycle frames. Everything is new!
Since I am familiar with the metalworking industry at home and processing with metals, it wasn`t a problem.
It began with the question which frame size and dimensions I order to even find the beginning, because I had no way to measure a similar vehicle. In
addition, the following points were important:
• Under seat steering (Direct-Steering), for the relaxed riding position.
• Full suspension
• If possible, all in stainless steel (to save powder coating). The frame should get polished metallic lettering get the rest should be glass bead
blasted.
• Square 40x40x2 tube for the main frame. When this recumbent bike is done, I can always weld something else or even afterwards drill into the threaded holes 2mm wall thickness, a
difficult thing at small material thickness. I was thinking about some bicycle rack systems. Incidentally, the extra weight of the finished frame over a square
tube with 1.5mm material thickness of 3.5 kg is negligible. You can save more on your body weight ☺.
• It gives the recumbent more stiffness. Torsional stiffness, which I missed at our old bought tandem.
• Internally install cables, since I come from bicycle race sports (triathlon), I find that hiding such details elegant.
• The frame should be foldable for transporting in the car or on the airplane.
• Maximum ground
clearance. The bottom bracket of the stoker should not be too close to the ground. Especially with larger wheel spacings and crossing of "hillocks" important!
• Optimal distance between my wife and me to reduce the wheelbase and thus the turning circle.
• Rohloff hub gear, because the freedom of maintenance.
From the internet I printed out similar vehicles and "translated" the scale wheelbase, seat heights and inclinations, bottom brake spacings and heights (at least
nearly).
Then I built from scrap parts of a free-standing frame on which I cut off the bottom bracket from old bikes (also from the junkyard) including pedalry and welding the ballpark,
subsequent positions on the frame. Finally the seats that I had bought on the Spezialradmesse in 2012 Germersheim now assembled.
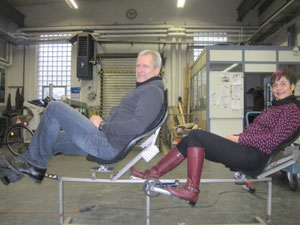
To find out the average position of the bottom bracket on our leg lengths, my wife and I sat on this vehicle and I corrected the positions of the bottom bracket again (see
first photo below).
This finished frame was then the "template", the background against which I on a workbench piece by piece from the tip to the end of the frame built (see second photo below).
The further steps are to be found in the next sub-pages ...